Showing posts with label Buttons. Show all posts

Sunday, 21 April 2013

Super Saturday- Stratford and THE SUN!


Oh yes, the sun has finally made an appearance and has therefore significantly improved my mood!

A while ago I booked a free-machine embroidery course at Sew Me Something (www.sewmesomething.co.uk). It had taken so long to come around that I had almost forgotten about it. I left Mr Jones at home and ventured off to Stratford-Upon-Avon. Miraculously I managed to get there bang on time despite leaving late and missing the car park. There were a lot of people in costumes, I later found out that it was Shakespeare's birthday so there was a parade in town, sadly Mr Jones and I missed it but worth remembering for next year.

Sew Me Something Logo

At Sew Me Something I was welcomed by Jules (the owner), Julie (the teacher) and about 6 other participants in the workshop.

We started with the basics of free-machine embroidery, followed by a play on the machines.


My practice embroidery - house, stick-man and penguin
After this we thought about the pattern that we wanted to create. I decided to stick with penguins and set about finding my fabrics and cutting out lots of oval paper templates.

Thinking about the layout and fabrics

The longest part was finding a suitable fabric for my penguins to sit on, I wanted it to be quite bright but also quite iceberg like- apparently this is a tough ask! Once I had settled on my fabrics and had all of my pattern pieces cut out I ironed the fabrics onto some bond-a-web and then cut all of the pieces out.

For the larger pieces of fabric I zig-zag stitched them on. I then ironed down the other pieces of fabric.

Ready for the free-hand part
No came the scary part; the free-hand embroidery. I found this really enjoyable and easier than I had imagined. If I was doing this at home I think I would have been tempted to unpick all of the lines which weren't perfect but as I was thinking about time, I decided to leave them and I am glad that I did because I think it really adds to the effect.

Progressing nicely

Having got to this stage I started to think about eyes. Julie made a fabulous suggestion to use buttons and Jules made it even better by suggesting that I sew them on with orange thread. This is the benefit of workshops rather than working by yourself; the chitter-chatter, the cake and the genius ideas! Julie kindly stapled my finished embroidery onto the frame and my work was complete.

Finished!

I ran back to the car (as my parking ticket was running out) with my penguins proudly on display!

Once at home I continued the crafty theme by doing some screen-printing in the garden with Mr Jones

Preparing for some screen-printing in the sunshine
Mr Joneses raven stencil
Trying with poster paint - not a huge success but OK
Trying with emulsion - just needs a stronger stencil

And then made a liberty patchwork cushion which Mr Jones had bought for me at Christmas but I hadn't found the time to stitch until now.

Liberty cushion

We finished the day, very happily, with a film and a curry!

Love,
Mrs Jones
x

Sunday, 6 January 2013

More wedding makes


A belated post, as we are quickly approaching our first anniversary, but, here are a few more of the wedding makes. There are more, including the dress but I think this will suffice for now.

The invites
So this crazy making all started with the invites. We batted around ideas for quite a while but eventually found this picture in the back of a wedding brochure and decided to build are our invites around it.


Somehow we decided that tracing off the design onto acetate and then sticking it onto the invite was the way forward and not being someone to do things the easy way I decided to trace each one individually. This led to a bit of a production line but I was looking for work at the time so it keep me busy!

Tracing the design

Putting the cards together

A close up of the final design

To be honest collecting everyones address was a bigger job, and deciding on our gift list, and it was a very happy day, the day that I took them all to the post office.

The cake
Next we had to start thinking about the cake. We wanted to do a practice so it seemed sensible to do a Christmas cake that we could enjoy. I don't think it had quite struck us how much planning is involved in the cake- you need to make it in time to have at least a month to "feed" it, then you need to marzipan it two weeks before you are going to eat it and ice it a week before you are going to eat it. This means working all of this backwards. We decided to do a test run of the fruit cake as a Christmas cake.

Our test run
The Christmas cake turned out to be a huge success. I took the recipe from 'Cake decorating at home by Zoe Clark'
Cake Decorating at Home [Book]
The recipe book
We had seen this cake while we were in Peru and wanted to base our cake on this with the wonky layers, pattern and bold colours.
Our Inspiration

Maturing cake

The bottom layer

Packaged and ready to go
The cake toppers
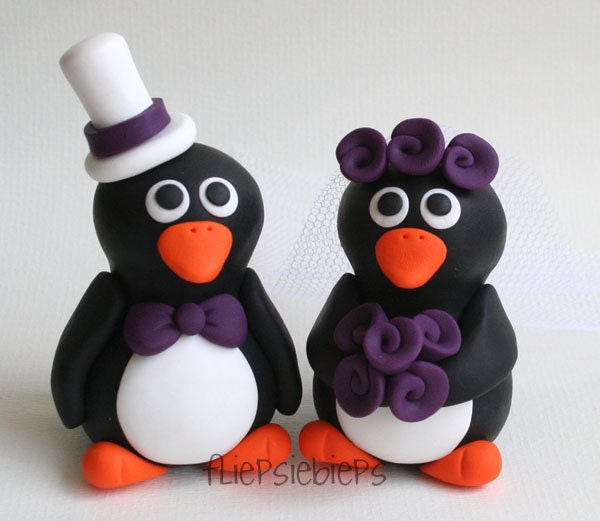
I then started to think about cake toppers and saw this brilliant idea on etsy: Penguin wedding cake topper
Penguin Wedding Cake Topper Custom
Cake toppers by fliepsiebieps on Etsy

These were unfortunately a bit too expensive for us so I decided to try and make my own, £7 and a couple of hours later I had our cake toppers!

My head in the development stage!

Ready for the oven

Our cake toppers


And, after some careful packing and driving, here is the finished cake:

The cake :-)
Other handmade items

I will be brief here because we made a lot and you are probably bored already, but, here is a selection of other bits that we made.

Props and signs for the photo booth

Planning the photo booth!
Photo booth in action

Table plan

Buttons on the back of my dress

Lace at the bottom of my dress
Handmade bouquet and shoe flowers
 It is so good to look back at this and think about all the effort that we put in, I hope you enjoy it too.

Love,
Mrs Jones
x